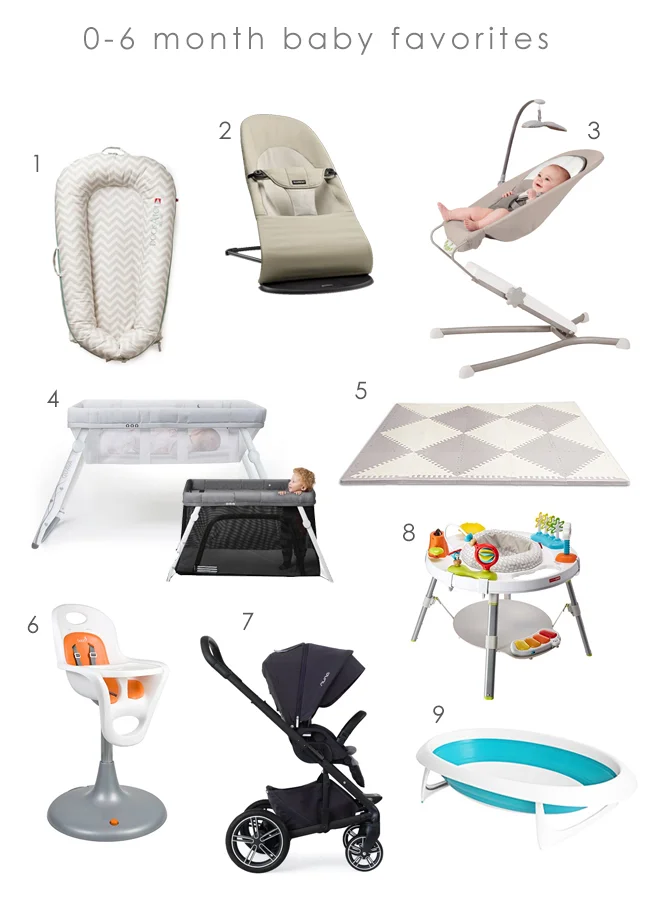
0-6 month baby favorites
/
Let's ignore the fact that I haven't posted since April and talk about the best baby gear for 0-6 month babies (and beyond)! I've been looking forward to posting about my favorite baby items since before we were pregnant. Is that weird? Seeing other peoples' favorites lists helped us to figure out what we needed/wanted, so I'm hoping this might do the same for some of you! I feel like we tried our best to not overdo it on the gear. I researched and found items (as best I could) that would grow with Lennon throughout the years. This causes you to sometimes spend a bit more, but it's typically very worth it. With the holidays coming, I thought it would be a great time to finally post these lists. (This post does not contain affiliate links.)
- Dock-a-tot Deluxe // Oh man, did we utilize this a LOT in the first 3 months. It was nice to have a safe spot to put Lennon in that was also super cozy. We didn't use this as a co-sleeper, but still got a ton of use out of it. The quality is top notch and it's so easy to move around the house. Lennon loved napping and playing in this in those early months. Now she loves crawling in and out of it. (disclosure: Doct-a-tot sent me this product to try out for free and review.) I was really happy having this product and would recommend!
- BabyBjorn Bouncer // This was one of those "grow with baby" items that we are still using today! This seat was awesome for the more upright and non-crunched position when Lennon was having some reflux issues. It's also very breathable and the material molds itself to your baby's head to help prevent flat spots. I still use this with her multiple times per week so I can take a shower. It folds down easily, is easy on the eyes, can later be used as a seat, has 3 different positions, and is also super easy to move around the house. Only con is no auto-bounce. :) A friend sent us the toy bar which Lennon loves!
- Skip Hop Multi-level Bouncer // This may seem redundant with the seat above but that was not the case at all for us. The height adjusts from floor to table height (and anywhere in between), depending on where you want baby. We've used this non-stop from about 1 month and still use it today. We had to support Lennon's head the first 1-2 months with a rolled burp cloth (the actual seat angle doesn't adjust) but this seat saved us. The vibrations were incredibly soothing to her and we actually called this "the magic poop chair." It seriously helped her with pooping and all of the crazy infant gas. She didn't sleep in it at all, but would sit in it happily for 10-25 minutes at a time. Those minutes are so precious in the beginning. I could plop her in it and actually have time to make breakfast. She still loves hanging out in this seat and eating ice with product #3 listed below. HUGE fan of this seat! It's also not overwhelming in size at all.
- Lotus Bassinet + Crib Bundle // I cannot express my LOVE for this product enough. We used the bassinet for our bedside bassinet and it was perfect. It was easy to rock with my foot hanging off the bed in the middle of the night, has a gentle rock, is big enough to use for at least 6-12mo, has mesh sides for breathability and so you can see baby, is incredibly lightweight, and easy to set up. The best part is the frame is also used with the larger crib. If you check out the link and video it will make a lot more sense. The larger crib packs down easily and is very lightweight, especially in comparison to most portable cribs.
- Skip Hop Foam Playmat // A playmat that is easy on the eyes. We have this in our main living space on the wood floor and love it. I use the dustbuster on it for crumbs and dog hair.
- Boon Flair High Chair // I went back and forth on high chairs for way too long. I didn't even register for one, because I couldn't decide. After seeing our friend use this chair with her baby, I fell in love. Major pros: You can easily roll it around the kitchen if you have wood or tile floors, crazy easy to clean (no where for crumbs to hide), height adjustable from table to counter height, pop off tray liner for easy tray cleaning. I also like that it doesn't have a wide-leg footprint like a lot of high chairs. We actually found this on Craigslist for $50!! Such a steal of a deal and very happy with it. It's not exactly my style, but I couldn't pass up the CL deal and how easy it is to clean. Even for the full price, I'd say it's worth it.
- Nuna Mixx // My goal was to find a stroller that would be durable for city sidewalks and lots of adventures away from home. I love the look of this stroller, high quality build, small footprint, adjustable seat (goes fully flat and faces out or in), large rubber tires, large canopy, opens and collapses very easily, and the push bar height adjusts easily. I would say the downside is that it's on the heavy side (25lbs) and when collapsed, you can't stand it on its end for easy storage (like the Uppababy strollers). Nordstrom typically runs a package deal on Nuna stroller/carseats during their half-yearly sales!
- Skip Hop Activity Center // Another big hit item that grows with baby to many stages. It changes from a 360-turning seat, to an activity center for pulling up/cruising to, and eventually to a table. Lennon has been using the seat component since 4 months old and still loves it! It's also adorable and the "keyboard" music isn't too loud/obnoxious.
- Boon Collapsible Bathtub // If you can't tell, I have a major love for Boon and SkipHop products. They're just so well made and well designed. This tub did not disappoint! It was absolutely perfect from birth to about 7 months, when we started putting Lennon in the big tub. It collapses and doesn't take up much space, can adjust to an angle before your baby is sitting up, and is a cinch to keep clean. For the first month or so we used this inexpensive body sponge to keep Lennon from sliding around. It was perfect! I had the hardest time deciding on a tub but was beyond happy with this one.

- Reusable Baby Wipes // Before we started using our cloth diapers (we use these diaper flats) we eased in with cloth wipes. We both love cloth wipes! They are so much easier to use than traditional wipes. If you don't mind the laundry, cloth wipes are a game changer. We make a simple solution using filtered water and lavender witch hazel (about 1/4c mixed with 4 cups water with 40ish wipes), but even water-only works. We have about 60 wipes total, which turned out to be the perfect amount for doing diaper laundry every other day.
- Thirsties Snap Duo Diaper Covers // Using diaper flats (or prefolds) with waterproof covers is about the cheapest option (and most slim-fitting!) for cloth diapers out there. I have nothing bad to say about these waterproof covers at all! They've been perfect. We have less blowouts in these than when we use disposable (for outings and in the early months) and they clean easily. We only had 5 covers in the first size and are now moving up to the next size. Having 6/7 covers wouldn't be unreasonable, especially if you're starting to use them in the early days with a million poops. I only change to a new cover if it is noticeably soiled with #2 or if she pees onto it while changing. I never experimented with cloth diapers overnight. Diaper changes with this system take maybe 15 seconds longer than with a disposable diaper. There is definitely more work with laundry, but we're happy with our system and flexibility in sometimes using disposables.
- Boon Pulp Silicone Feeder // These are the best! Lennon loves sucking/chomping on ice in these and they're also great for introducing new foods. She started using them around 6 months and still loves them! They're a cinch to clean (unlike the mesh feeders) and have a simple design. Highly recommend! If you invite me to your baby shower you'll definitely be getting one of these.
- Lifefactory Glass Baby Bottles // These bottles have been great! They're simple to clean, extremely durable (no breaks!), and Lennon took to them fairly easily. It took her a handful of attempts, but we stuck with the same bottle instead of trying multiple brands. Once she got the hang of it, there have been no issues since! Because I work at home, having 4 small bottles and 2 large bottles has been the perfect amount for us. Chris started giving her a nighttime bottle around 4 months and sometimes daytime bottles if I'm out of the house. She started taking more than 4oz at night around 5 months, so we switched to the big bottles and she now takes 8oz with the size 2 nipple. She was collapsing the nipple and taking forever to eat so we switched around 8 months, even though you always read not to for breastfed babies. It's much easier to feed her now and hasn't affected BF'ing. When I pump, I use the plastic medela bottles then pour into one of the Lifefactory bottles for the next day's night feed (or into a milk freezer bag).
- Milkbarn Burp Cloths // We got these for a gift and they're one of Lennon's favorite things! We used them more as a toy/lovey than a burp cloth, but they are great for drool, too. These were the first thing Lennon really played with. She loved grasping them and waving around. We also utilized them for months on our daily walks draped over the stroller seat bar to cover L's legs feet from the sun. They're soft and adorable and make a great gift!
- Zutano Fleece Booties // These are an absolute must!!! They stay on and are super cozy. They do run small, so size up. (We started with the 6mo size as a newborn and just got the 12mo pair with grippy bottoms for this winter.) Also love their cotton booties!
- Halo Fleece Sleepsack // The hospital actually gifted us one of these to us and it was amazing. I probably wouldn't have purchased otherwise but am so glad we ended up with one! Lennon was born in January, so fleece was the perfect option. We used this at night but cotton swaddles for naps during the day. I also feel like it's a bit stiffer (in a good way) than the cotton varieties and kept her a bit more snug at bedtime.
- Muslin Swaddles // While I was determined to use these as our only swaddles, that did not actually pan out. They're such a pain to mess with after night feedings and diaper changes. Once I succumbed to the sleepsack above, I was much happier. However, these are awesome for a bunch of other uses. I definitely recommend having at least 2! I have a few different brands and don't notice a difference them.
- Love to Dream Transition Swaddles // I'm so glad I stumbled on these in my swaddle searching! We started using these around 4 months when we moved Lennon to her crib for naps and nighttime sleep. They hug the body snuggly (not too tight) and let babies keep their arms in the "up" position. It gives them a little more freedom to move their hands/arms around, while still being zipped in. Lennon had a major startle reflex for months, but this swaddle really helped transition her from the SwaddleMe velcro-wrap type, as she started to get a little more alert/mobile and wanted her arms up. I went back and forth deciding between different swaddle brands, the merlin sleep suit, etc. but was extremely happy with these. Once she started rolling and we unzipped her arms, it was a seamless transition! (Some don't have the zip-off arms, but I highly recommend getting that style for their versatility.) We used these from 4-9 months (bought 2) and then bought these sleep suits and LOVE them as well. They're super cozy.
- Osprey Poco AG Plus // If you're into more serious hiking and will be hiking in hot weather, a hiking backpack is crucial. The airflow between your body and baby is amazing, baby sits high up for easy looking around, and the weight distribution is much better than traditional baby carriers. It also holds everything you need for your babe and some of your gear as well. We loved that the Osprey includes the sun-shade in the pack itself. Lennon seems to love this, too!
- Solly Baby Wrap // While it took me a few weeks to muster up the courage to learn how to use it (everything is overwhelming in the early weeks!), this wrap was absolutely amazing and necessary. I started taking Lennon on walks in this wrap and then from 6 weeks - 4 months, it was the only place I could get her to nap for long periods of time (we tried a million different things). She took a short morning nap in the swing and then would sleep in the Solly Baby for 2, 2-hour naps every single day. It allowed me a little more freedom than being stuck on the couch for those naps. The lightweight material was cozy and perfect. After 4 months, we moved her to her crib for naps and night sleep and sleep trained.
- Lillebaby 6-in-1 Complete All Seasons // This carrier has been amazing, especially after watching some youtube videos on how to get the perfect fit for you and baby. Chris has no problem using this carrier, either. Lennon loves it and will still take a nap in it if we're on the go.
other favorites:
- Naturepedic Lightweight Ultra crib mattress // The lightweight aspect of this is absolutely amazing. So easy to change the sheet and mattress cover. Love the 2 firmness options and that it's made with mostly organic, non-toxic materials and made in the USA. I lamented over this purchase for months but am so happy with our choice. Many mattresses on amazon claim to be non-toxic, or "organic," but are very misleading. Naturepedic is actually based 30min away from where I grew up. Their customer service is great if you have questions or problems!
- PUREgrace mattress cover // We have two and they're perfect.
- Babyletto Hudson crib // We love the style and quality of the Babyletto cribs and that they use all non-toxic paints and finishes and sustainably sourced wood. We also bought the matching dresser and my parents bought the full-size foldable Babyletto crib for when Lennon visits.
- Burt's Bees organic fitted sheets // These are my favorite sheets. They're super soft jersey knit cotton, durable, and have cute prints/colors.
- Burt's Bees burp cloths // soft, durable, perfect size, perfect thickness
- Graham Glider from West Elm // We got a great deal on this during one of WE's big sales and are very happy with the purchase. It's slim and modern, but perfect for both Chris and myself. I love how the sides stick out the whole way up and use them to lean my head on all.the.time. The "performance velvet" is very easy to clean. We bought a "pouf" footrest on Etsy and didn't mind not having a foot rest that glides.
- Honest overnight diapers // I couldn't wait until Lennon could fit into these! They start at size 3, so before she hit that weight we used the Bambo diapers (which held up really well overnight!). We stopped changing Lennon overnight around 6ish weeks, unless we knew she had a poopy diaper. This helped her fall back asleep after feeds much more easily.
- Goumikids products // Do not even waste your time with other baby mittens. The velcro addition to these is the best. Seriously. We used the velcro booties non-stop as well, instead of socks. Baby socks are the worst!! The adorable sleep gowns are insanely soft and make diaper changes easy. I also like that they contain their feet, instead of being open on the bottom. They run a little long/slender. The quality of this brand is top notch!
- Baby Gap clothing + pj's // We've had great luck with the quality and sizing of Gap clothing. (Lennon is 80th % for height and about 45th % for weight.) Also, their sales are amazing! Never buy anything full price.
- Carter's zip, footed pj's // Cute, soft, durable!
- Chicco orthodontic pacifiers // We switched Lennon from the standard soothie pacifier around 3 1/2 months to the chicco. They're awesome, and she was able to hold it much more easily in her mouth.
- Fridababy products // I can't say enough good things about this brand! - nail clippers (seriously the best!), nose frida (definitely use with saline!), windi (used a lot in early gassy months) -- Now I'm seeing the medi-frida and definitely need to order it. Lennon hates taking medicine straight from the syringe.
- Bandana bibs // Too cute. A must for teething, drooling babies.
I'm sure this list looks completely overwhelming, but I tried to hit the hot items we absolutely love, use non-stop, and would buy again in a heartbeat. My hope is that this helps some of you make registry decisions or choose baby gifts. I'm happy to answer questions about our experiences in the comments! If you have favorite products, feel free to leave in the comments as well.
I hope you all have a wonderful Thanksgiving!
Ashley
This post does not contain affiliate links. Dock-a-tot did send me their product for free to try out and review.