breakfast friday >> roasted tomato, kale, + herb tofu quiche

Friday is now my favorite day of the week.  [Before I typed Friday I actually typed "breakfast."  Yes, in my world "breakfast" is a day of the week.]

I mean, there are obvious reasons for Friday being the best day of the week, but since starting Breakfast Friday I literally cannot wait for Fridays!

untitled-1965.jpg

So many recipes to share.  Not enough Fridays.

crust.jpg

This recipe came about after a reader asked if I had any savory vegan breakfast ideas.

I have a few in mind but wanted to start here for a few reasons.

  • Great for a crowd!
  • Awesome if you're new to tofu.
  • Super flavorful + fresh.
  • Can be served for any meal of the day.
  • Absolutely delicious straight from the fridge!
untitled-1994-2.jpg

Yesterday was a hot day in the kitch, for sure, but it was beyond worth it.

untitled-1998-3.jpg

The idea for this tofu quiche came from the lovely Sara, over at Sprouted Kitchen.  I found it in her cookbook a few months back and was pleasantly surprised at how tasty it was.  I may even go so far as to say I like tofu quiche more than egg quiche, and you know how much of an egg-lover I am!  I've made numerous recipes from her book and have yet to be disappointed.  My favorite so far are the lentil meatballs with lemon basil pesto.

untitled-2002.jpg

In this version I adapted the crust to use both ground oats and almond meal, and in the quiche I added a few ingredients and took a few away, like nutritional yeast + tahini.

untitled-2005-2.jpg

You'll see in the recipe that I call for fresh herbs.  Feel free to use any herbs your prefer!  I used a mix of basil, oregano, rosemary, and a little lemon thyme.  I liked using a mix but if you only have 1 or 2 that will do just fine!

untitled-2014-2.jpg

Roasting the tomatoes is definitely worth the effort and helps avoid a soggy, wet texture in the quiche.  Also, while they're cooking you can get most everything else done to prep for this meal.  

untitled-2017-2.jpg

Print this!

adatped from: Sprouted Kitchen tofu quiche in rosemary almond meal crust

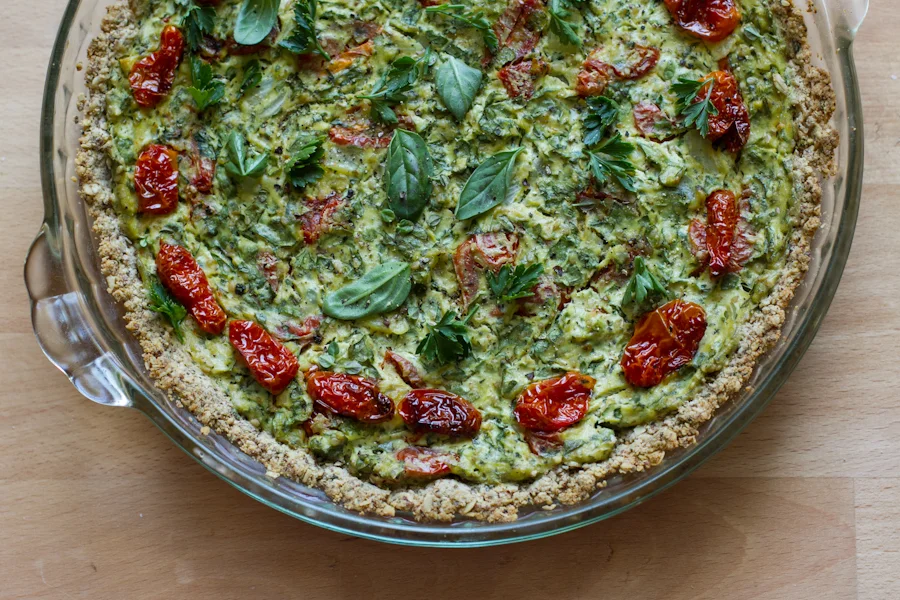
Roasted Tomato, Kale, + Herb Tofu Quiche with Oat Almond Crust

gluten-free, vegan // yields 1, 9-inch quiche ~4 servings

for the quiche:

  • 1, 14oz package firm tofu, drained
  • 2 cups chopped lacinato/dinosaur kale, stems removed, washed + dried
  • 1 1/2 cups cherry tomatoes, halved
  • 3/4 cup chopped sweet onion
  • 1 1/2 tablespoons extra virgin olive oil
  • 1 1/2 tablespoons sesame seeds
  • scant 1 tablespoon unsweetened almond milk
  • 2-3 teaspoons chopped fresh herbs
  • 1 1/2 teaspoons minced garlic
  • 1/4 - 1/2 teaspoon salt + pepper
  • few glugs of hot sauce, optional
  • oil, for cooking tomatoes + onion

for the crust:

  • 3/4 cup almond meal
  • 3/4 cups ground gluten-free oats, slightly more coarse than flour but oat flour will also work
  • 1/4 cup gluten-free rolled oats
  • 3 tablespoons softened extra virgin unrefined coconut oil
  • 1 tablespoon chopped fresh herbs
  • 1 tablespoon cold water
  • 1/2 teaspoon salt + pepper
  1. Preheat oven to 400* F and line a large baking sheet with parchment paper.
  2. Lightly coat the halved tomatoes with a drizzle of oil and a light sprinkle of salt + pepper, then roast for about 30 minutes, stirring once halfway through until shriveled and starting to brown.  Let cool.  
  3. Turn oven down to 375* F.
  4. While the tomatoes are roasting, heat a pan over medium with 1/2 - 1 tablespoon of oil.
  5. Once hot, add the onion and cook stirring frequently for about 7-10 minutes until cooked down and starting to brown.
  6. Add the garlic and stir for 30 seconds - 1 minute until fragrant and light brown.  Remove from the heat and let cool.
  7. Mix the almond meal, ground oats, rolled oats, herbs, salt, and pepper in a large bowl.
  8. Add in the coconut oil and cold water and mix with your hands until the mixture starts to hold together when squeezed.  If it seems dry add 1/2-1 more tablespoon of coconut oil.
  9. Lightly grease a 9-inch pie dish and empty the dough into the pan.  Press firmly starting at the center and work your way out, pushing the dough up the sides of the dish.  You want about 1-inch of dough pushed up on the sides.  
  10. Once the bottom is firmly pressed, firmly pack the dough all the way around the sides of the dish.  Refer to photos 2/3 to see the sides loose, then packed.  
  11. Bake for 10-12 minutes until just starting to brown.  Let cool.
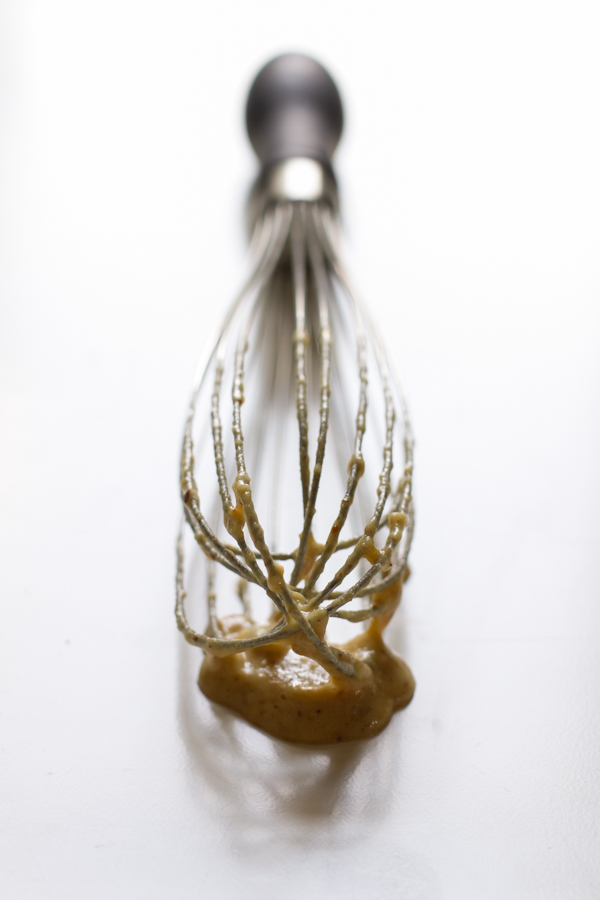
  12. Place the tofu, 1 1/2 tablespoons olive oil, sesame seeds, almond milk, fresh herbs, salt, pepper, and a few glugs of hot sauce into your food processor and process until fully smooth. ~30 seconds.  Scrape the bowl and process another 5-10 seconds.
  13. Pulse the kale in until evenly distributed + well-chopped. ~10-20 pulses 
  14. Empty mixture into a bowl and stir in the tomatoes and onion mixture.  Reserve some of the tomatoes to place around the edge if desired.
  15. Pour the mixture over the crust and smooth out.  Place tomatoes around the edge if desired.
  16. Bake uncovered for 32-37 minutes.  The top will feel set and look cracked and the crust will be golden brown. 
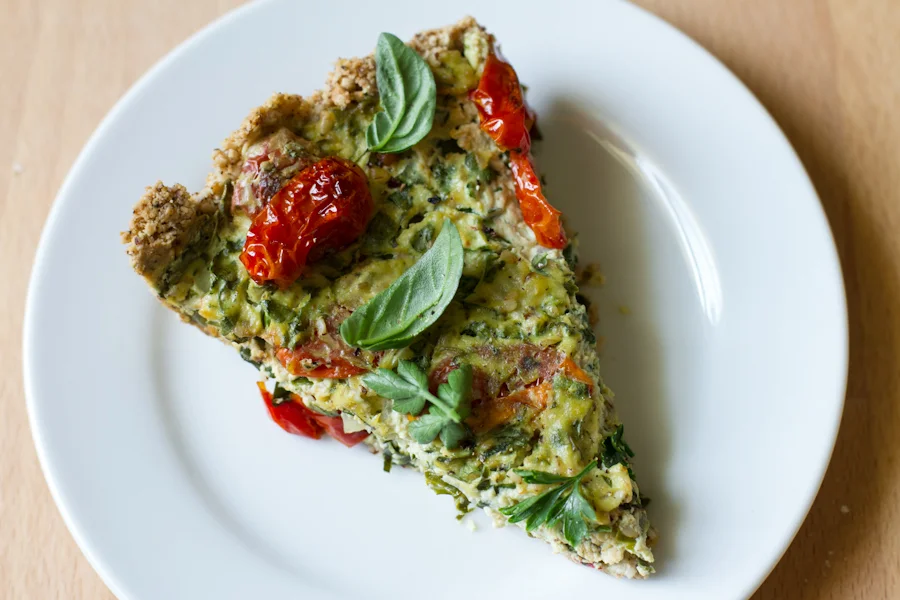
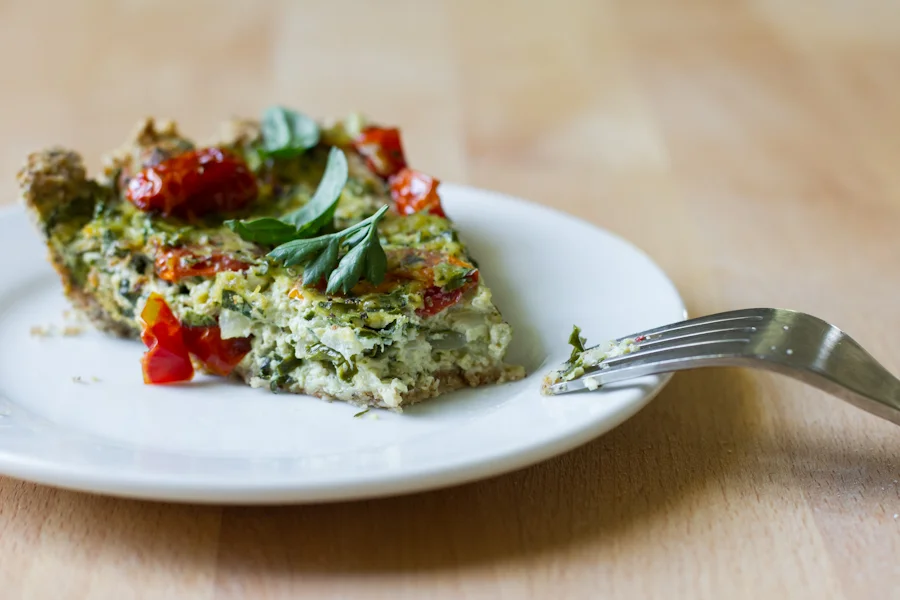
  17. Let cool for 10 minutes to let things solidify, slice with a very sharp knife, then remove with the help of a flexible spatula.  The first slice is always tricky!  Crust should hold together when sliced [especially with mini tart pans] but it is somewhat fragile.

notes: Let fully cool before wrapping and storing in the fridge for 2-3 days.  I would imagine softened vegan butter [ie: Earth Balance] would work as a substitute for coconut oil, or real butter if not vegan.  This can also be baked in 3-4 mini tart pans or baking dishes to serve individually.

untitled-2024-3.jpg

Breakfast.  Friday.  Summer.  What could be better?

Ashley

Don't forget to tag any of your breakfast creations throughout the week! #bfastfridayclub

Honey Dipped Doughnut Waffles

Apologies if you experienced any shenanigans with the blog yesterday.  It seems to have been down for awhile.  Squarespace got it back up and running overnight, which I was so happy to see this morning.

Enough about blog-things.

The most amazingly, spectacular kitchen-thing happened yesterday!

untitled-2032.jpg

You are all aware of my current waffle obsession, correct?  It's getting bad.  I can't tell you the last time I've had something other than a waffle for breakfast.  It's been months.  They're just so easy...and delicious...and...well, delicious.

I know many of you do not own waffle irons and I totally get it.  It's just one more clunky kitchen appliance to have around and they obviously are not free.

untitled-2034.jpg

Well, I think it is time that the waffle iron gets put at the top of your, "next kitchen appliance list."  [I know you have one!]  Check garage sales, thrift stores, and Craigslist for deals!  Because, not only can you make everyday waffles, savory waffles, and cornbread waffles, but now you can also make DOUGHNUT WAFFLES.

Yes.

Doughnut--freaking--waffles.

What the heck does that even mean?  They look like waffles, not doughnuts.

It means:

You can make a recipe for baked doughnuts [like the 101+ that will be in my book in October!! shameless plug!] and pour the batter into your waffle iron instead of baking them in your oven in a doughnut pan.

!!!!

untitled-2040.jpg

This is about as exciting as when I turned pancake batter into CAKE.  

untitled-2054.jpg

I swear I am not hopped up on coffee + waffles right now....

untitled-2060.jpg

So what is this drippy goodness that is glistening all over these hybrid beauties?  

HONEY.

Boiled honey.  Which happens to be much, much easier to dip things into than non-boiled honey.  It soaks into the doughnut-waffle without making it soggy and creates a slightly less sticky mess.  

untitled-2061.jpg

Sweet but not overly so.  Breakfast or dessert.  Full-size waffles or minis.  Whichever you prefer.

It was probably one week after I was thinking about this idea--because I can't stop thinking about waffle creations--that I saw Sweet Treats try it out with success.  That's when I knew I had to put it to the test with some of my recipes.  Her waffles turned out way more adorable than mine, but I still love the idea to make mini waffles instead of full-size.  But they will work at any size you like!

untitled-2066.jpg

This recipe is actually straight from my book, Baked Doughnuts For Everyone.  The only change was not adding quite as much milk, because I was after a slightly thicker batter.  I couldn't believe how similar these were in texture to the doughnuts and each batch only took about 3-4 minutes to cook! 

Although, I guess you do have to cook a few batches, so it probably takes almost the same amount of time.  But on the bonus side you won't have a doughnut pan to clean afterwards.

untitled-2074.jpg

Print this!

Honey Dipped Doughnut Waffles

gluten-free // yields 12-14, 3-inch Belgian waffles

  • 1/2 cup gluten-free oat flour, or gluten-free all purpose blend
  • 1/2 cup sweet rice flour
  • 3 tablespoons almond meal
  • 2 tablespoons sucanat, or coconut sugar/pure cane sugar
  • 1 teaspoon baking powder
  • ½ teaspoon salt
  • 2 large eggs
  • 1/4 cup unsweetened almond milk, or 2%
  • 1/4 cup unsweetened applesauce
  • 1/2 cup + 3 tablespoons honey, divided
  • 2 tablespoons safflower oil, or other cooking oil
  • 1 teaspoon vanilla extract
  1. Preheat your waffle iron to medium heat.  Grease if needed.
  2. Place the oat flour, sweet rice flour, almond meal, sucanat, baking powder, and salt in a large bowl mixing until well combined.
  3. In another bowl, whisk the eggs together, then whisk in the milk, applesauce, 3 tablespoons honey, oil, and vanilla extract. 
  4. Pour the wet mixture into the dry ingredients and whisk together until just combined [stop when you no longer see dry flour.]
  5. Let the batter rest for 5-8 minutes undisturbed.
  6. Spoon small amounts of batter into your waffle iron for mini waffles.  For my 7-inch Belgian waffle maker I made about 3 mini waffles at a time to prevent them from touching.
  7. Cook according to your waffle iron manual.  Mine were perfect after 1 cycle over medium.  Soft + fluffy with a cakey center.
  8. Set your waffles on a cooling rack as they finish cooking.
  9. Then, in a small pot over medium-low heat bring the honey to a low boil, whisking occasionally. 
  10. Turn off the heat and pour in a shallow bowl just large enough to dip the waffles. 
  11. Using caution [honey will be very hot!] dip the top of the waffle in the honey and let the excess drip off.  
  12. Place on a cooling rack for 1-2 minutes [so you don't burn your mouth!] before serving.  

notes:  If you want to serve your waffles hot keep you oven at 200* F and place the waffles on a baking sheet in your oven as they finish cooking.  Remove from the oven and dip into the boiled honey.  Waffles are great served warm or at room temp.  Waffles can be made full-size or mini.  Avoid a high heat setting as the outside will brown before the inside is finished cooking.  Any type of waffle maker should work to make these.  There are no perfect substitutions for sweet rice flour or almond meal.

untitled-2090.jpg

So fluffy and soft.  And doughnutty.  And waffly.  

Doughnut Waffles.  This is now a thing.

Ashley