Food Photography Tip of the Week |22|
/Food Photography Tip of the Week |22|
What’s inside my camera bag?
When I was just starting out learning photography—and really still today—I was always interested in the gear other photographers were using, especially which lenses. One things for sure, camera gear is expensive. My collection has been s.l.o.w.l.y. growing over the past 5 years.
It all started with a bunch of gear Chris bought. I’m sure you’ve read the story but here’s the Cliffs notes version. Chris bought an entry level dSLR and 4 lenses to start learning photography when we lived in Charlotte. After moving to Denver and starting Edible Perspective I basically hijacked the camera after previously swearing off ever learning how to use it. One of the lenses he first bought was the “nifty fifty” which is the Canon 50mm 1.8. It’s basically the lens everyone buys because it costs $125 and takes pretty dang good photos.
I rolled with this setup for about 2 years:
- Canon Rebel xti [they don’t currently make this model]
- Canon 50mm 1.8
- Tamron 28-75 2.8 [the earlier model was much cheaper]
I then upgraded to the Canon 50mm 1.4 which may seem kind of silly after already having the 1.8 but it’s a much higher quality lens and is still fairly inexpensive [$399]. The quality of the lens body is more durable, the lens is noticeably sharper, I felt the colors were a bit more vibrant, and it also operates much more smoothly and quietly when hunting to focus on the subject. Plus you get a little boost in aperture capabilities going from 1.8 to 1.4. The 50mm 1.2L jumps up significantly in price [$1550] which wasn’t in the cards at that point.
I pretty much stopped using the Tamron because I wasn’t impressed with the sharpness and only used the 50mm 1.4 for about 1.5 years.
The Rebel body was limiting, though, with the max ISO at 1600 and really only usable to 800. It was great to learn on but I needed an upgrade. About 2.5 years ago I researched and bought a refurbished Canon 7d body and used that with the 50mm 1.4 until March of this year when I bought the Canon 35mm 1.4L [it was $100 off at the time for $1330]. My first L-series lens! I landed a sizable freelance job and made the purchase immediately after deciding that was the next lens I wanted.
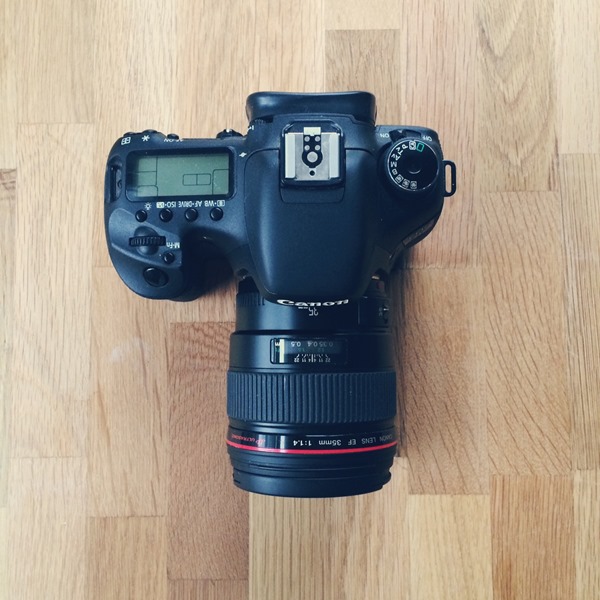
My current body + lens setup:
- Canon 7d
- Canon 35mm 1.4L
[I also have the Canon 600EX Speedlight flash for wedding photography and I’ve also used it for product photography.]
Pretty dang simple.
Since buying the 35mm lens I have yet to put the 50mm back on. The sharpness and wider frame are such a huge upgrade that I’ve never had a reason to switch it back. Plus, the 35mm is awesome for portrait photography. The wider frame makes a big difference and you don’t have to stand back nearly as far to get your subject in the frame.
I absolutely love the Canon 7d but would love the extra ISO boost [among other features] with the 5d Mark iii. That’s still a ways off, though.
So what other gear is stashed in my bag?
- This shoulder sling camera strap is amazing. The camera hangs right at your hip and you can easily slide the camera up to your eye. I don’t use this much at home but when I’m out or shooting families, weddings, etc. it’s a mush have.
- Memory cards [compact flash] – You may not need a 32GB card if you’re just taking food photos for your blog but that one is a must have for wedding photography. I think the 16GB and 8GB are good to have for food and general purpose. I always role with the SanDisk brand and have never had any issues with them. I always reformat the cards after uploading to my computer.
- Lens Cleaning Kit – You’re bound to get dust and smudges on your lens or lens filters. Never wipe them with a towel! The air blower [not pictured] is key to blow dust particles off so you don’t brush them into the lens glass.
- Extra batteries – I have 3 batteries which I always have rotating in the charger and ready to go. It’s the absolute worst if you’re in the middle of a shoot and your battery is dead with no backup. I’ve had really good luck with the off brand battery I linked to.
- Camera Level – This is such a useful tool when you’re using a tripod! It slides right into the hot shoe slot.
- Remote Shutter – I talk about this awesome tool more in this post but it basically lets you activate the shutter away from the camera, which is super usual for motion shots. Be sure the remote shutter you buy is meant to connect to your specific camera.
I’m still using the original tripod Chris bought years ago. It’s a Velbon brand tripod, but I can’t find the exact model.
So what bag do I put all of this gear in? When I’m traveling or doing a simple portrait photo shoot I usually roll with the bag below. I found this on Etsy years ago and it has held up amazingly well. It’s very comfortable to wear and not at all cumbersome. I absolutely love it!
There are two pockets [in the back and front] to hold small items like batteries and memory cards and then 3 areas in the center to hold a camera with a smallish lens on and 2 other lenses or lens and flash, etc. It’s also great at holding 1 camera and a lot of airplane snacks.
When I shoot weddings the Domke bag below is what I use. Chris bought this for me about three years ago. It’s not as “everyday” as the bag above but is meant to serve a different purpose. It can hold 1 camera body with 1 lens, a second camera body [I rent a second when shooting weddings], 1 more lens, and external flash. The thick canvas material is super durable and although larger it’s still comfortable to wear.
So what’s next on my gear wish list?
- Canon 5d Mark iii
- Canon 24-70 2.8L
- Canon 100m macro 2.8L
What’s in your camera bag or on your wish list?
Ashley


